Sunday, May 26, 2013

Mom-To-Be Freezer Meal - Baked Penne W/ Sausage & Creamy Ricotta

If you didn't already know, I adore pasta! It's one of my passion foods... and surprise surprise, it's a carb, which I also love. So it was a given that I had to find a freezer meal friendly pasta, and thankfully, there are lots that work for freezer meals.
 
 
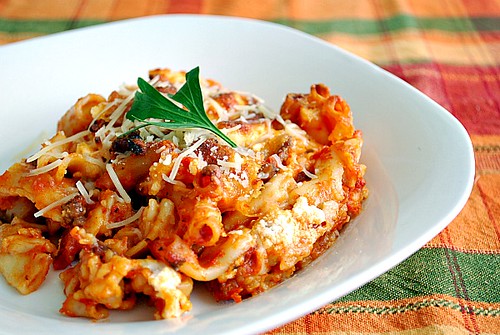
When I came across this baked penne with sausage and ricotta I knew right away that I wanted to give it a shot. Sadly, upon my first taste test, I wasn't overly impressed. It tasted SO bland. Even with the spicy sausage and the fennel.

BUT! Upon my second taste test after it'd been in the freezer for a few weeks, it tasted so much better. No doubt the flavours set in while it had been sitting in my freezer. I would make this again, but rather than eating it same day, I'd let it sit in my fridge or freezer to let the flavours mingle. I didn't have penne on hand, so I used rotini which I had plenty of in my pantry.
 
SO! Without further ado, here's the recipe:

Baked Penne with Sausage & Creamy Ricotta
 
Ingredients:
3 tbsp extra-virgin olive oil
2 garlic cloves, minced (I almost always use more garlic. Use to taste)
1 pound hot or sweet Italian fennel sausage, casings removed
1 (28 oz) can tomato puree
1 1/2 cups water
1 1/2 tsp sugar
1 bay leaf
1/4 tsp ground fennel (I didn't use ground - and I think I used around 1 tbsp or more)
salt and freshly ground pepper to taste
1 pound penne (as I said before, I used rotini)
3 cups ricotta
1/2 pound fresh mozzarella, cut into 1/2 inch cubes
1/4 cup freshly grated Parmigiano-Reggiano cheese
 
Directions:
 
Preheat oven to 400 degrees
 
In a large saucepan, heat 1 tbsp of the olive oil. Add the minced garlic and cook over moderate heat, stirring, until lightly browned, about 15-30 seconds. Add the sausage and cook, breaking up the meat, until browned, about 8 minutes. Add the tomato puree, water, sugar, bay leaf and fennel. Season with salt and pepper and bring to a boil. Simmer over low heat until thickened, about 30 minutes. Discard the bay leaf.
 
Meanwhile, cook the pasta in a large pot of boiling salted water until al dente. Drain the pasta and return it to the pot.
 
Reverve 1 1/2 cups of the meat sauce. Transfer the remaining sauce to the pot with the pasta. Toss to combine.
 
Spoon the pasta into a 9x13 inch baking dish. Pour the reserved meat sauce over the pasta and dollop large spoonfuls of the ricotta on top. Gently fold some of the ricotta into the pasta; don't overmix - you should have pockets of ricotta. Scatter the mozzarella on top and sprinkle with the parmigiano-Reggiano.
 
Bake the pasta in the preheated oven for about 45 minutes, or until bubbling and golden on top. Let rest 20 minutes before serving.
 
*Make ahead/Freezer meal:*
Prepare the reccipe above but spoon the pasta into a freezer- and oven-oven safe container. (I line mine with aluminum foil so there is less clean up at the end) Pour the remaining tomato sauce over the pasta and dollop large spoonfuls of the ricotta on top. Gently fold some of the ricotta into the pasta; don't overmix - you should have pockets of ricotta. Scatter the mozzarella on top and sprinkle with Parmigiano-Reggiano. Cover and freeze. When ready to serve, defrost and bake the pasta in 400 degree oven for about 45 minutes, or until bubbling and golden on top. Let rest for 20 minutes before serving.

Wednesday, May 15, 2013

The Difference Between Comfort Eating & Healthy Eating In Pregnancy

This entry is based on my experience with how I felt while I ate healthy - as well as when I ate less nutritious foods while I was pregnant.

Much like anyone, pregnant or not, one major point I noticed while I was eating healthier and more nutrient rich foods is that I had more energy and I felt better physically. I mean, even when I was eating healthy, I did have periods of time where I was still physically fatigued - let's face it, that's part of pregnancy, and can happen to anyone, pregnant or not, thanks to a variety of factors, say... a bad nights sleep?

On the opposite arc, when I ate nutrient deprived foods, I had lower energy and was more sluggish. As my pregnancy progressed, I noticed that I couldn't eat as much junk food and that eating the amount that I could pre-pregnancy and early in pregnancy actually made me feel physically ill. What do I usually want to do when I feel ill? Well, drink a tall glass of water and go have a nap or go to bed a little earlier. How did that work out? Well, I woke up in the middle of the night feeling like I needed to throw up. I could still smell the food I'd eaten earlier in the air, and boy! Thanks to hormone changes and heightened sense of smell, those smells were very potent - which didn't make me feel any better at the time. There was even one night I woke up feeling not only like I had to throw up, but I also had really bad diarrhea. Not a fun night for me, I can tell you that much.

Another huge difference I took note of - Victoria moved a LOT less when I ate crappy food with little or no nutritional value, even if it is loaded with sugar! And she moved quite a lot when I eat food that's good for us. I never would have guessed that this would be the case. It's becoming more and more apparent to me that junk food is toxic and that the habit of eating these junk/comfort foods is an addiction.

One thing I can say - if my baby didn't want it when she was in utero, why the hell should I be eating that crap?

What do you think about the eating habits of North Americans? Do you feel that pregnant women take licence to eat whatever they want whenever they want because they are preggo? Or have you noticed pregnant women you know making a conscious effort to eat healthy with a few treats thrown in?

Don't forget to scroll down past the comments and feed the goldfish!

Sunday, May 12, 2013

My little girl is here! Introducing Victoria!

My little girl has finally made her long, hard, laboured grand entrance into the world. While I won't be telling that tale in this entry, I figured there is no better day to introduce her to you than on mothers day. My very first mothers day.
 
 
Victoria was born 5:43 AM by c-section May 6, 2013; weighing in at 9 lbs. Pink, healthy and with a good set of lungs :)
 

I never thought that it would be possible to love someone SO freaking much... I mean, you hear other parents talk about their amazing love bond with their children and that there's nothing like it, but until you experience it, you don't have ANY idea.


So far, my nicknames for her are: My little piglet (she snorts when she eats), My little turkey neck (this girl has some serious neck chub ^.^), sweet pea or sweet heart and little darling. I still haven't decided if I'm going to use Vickie or Tori... we'll see.


This 'little' girl has huge feet. A lot of her socks don't fit her.


Chatum adores Victoria. He has decided to take on the roll as 'Victoria's protector'. Whenever she makes the slightest squeek, he stands at alert and checks things out to make sure things are all okay. He loves to smother her in puppy kisses.

Oh, and that bassinet you see her snoozing in in the picture above? We don't use it, like, at all! Victoria and I are spending our nights sleeping side by side out on the couch for the time being, since it's more convenient for me. I can have everything I need set up within arms reach on the coffee table so I don't need to get up (especially nice when I'm breastfeeding while laying down) and if I do need to get up to grab something quick to eat or to run to the washroom to pee, I only have to go a few feet.
 
So far, this Mothers Day, I was able to get in a fantastic nap, snuggle with my baby, oh! And we've had our first 'spa day' together. Me, playinng the esthetician. My daughter, got a sponge bath (to get rid of that milk run off that gets stuck in her little turkey neck folds) her nails and toe nails trimmed (because it sucks when they scratch me in the middle of the night) and an infant massage with vanilla oatmeal baby moisturizer.
 
I hope that you are having as great a day as we are. Just thought I'd brag about my little gem. :) <3

Saturday, May 11, 2013

Mom-To-Be Freezer Meal - Soups and Stews II

In my last post about soups and stews, which can be found here: http://one-eighty-loosed-a-kaboose.blogspot.ca/2013/05/mom-to-be-freezer-meal-soups-and-stews-i.html instead of me writing it out again or copying and pasting if you'd like to read more on that.

I sang praise to how easy it is to freeze soups and prepare soups from frozen. I wrote how I choose to freeze and package my soups (and stocks) and I really do believe that the muffin tin method is the easiest method, especially if you want to be able to make single serve portions.

The following soups are quite good, although personally, I wouldn't make them often.


Irish Beef Stew
This stew freezes really well.
Ingredients:
1/2 - 1 lb stewing beef
salt and pepper
2 tbsp olive oil
1 11.2oz bottle Guinness Draught (I actually haven't used this any time I've made this stew and it turns out fine, but I imagine it would add a new dimension of flavour.)
1 cup red wine (virgin wine works well if you don't have the alcoholic kind)
5 cups beef stock
1 tsp dried thyme (or a couple sprigs fresh.)
3 bay leaves
2 tbsp ketchup
3 large russet potatoes, peeled
2 large carrots (or 20 baby carrots)
1 yellow onion
2 tbsp butter
Fresh parsley

Directions:
If your beef is in large chunks, chop into small bite sized pieces. Sprinkle with salt and pepper. Heat the oil on med-high heat in a large stock pot and add the meat. Cook the meat for several minutes on each side, using tongs to turn over individual pieces so the meat gets nice and brown.

When your beef is browned, add the Guinness, red wine, beef stock, thyme, bay leaves and ketchup. Stir well. Bring the mixture to a boil, then reduce the heat to low and simmer while covered for 1 hour and 15 minutes.

While beef is simmering, chop your potatoes and carrots into bite sized pieces, and finely chop the onion. (If you have a picky eater in the house and have to pick out the inions afterward... sad, I know, you can quarter the onion instead, so the onion is easier to pick out.) In another pot, melt the butter on medium-high then add the potato, carrot and onion. Stir the vegetables so that they are coated with butter and cook for about 20 minutes, stirring every few minutes so that the vegetables get caramelized. Try and time it so your vegetables finish at about the same time that the simmering beef ends.

Add the vegetables to the beef and broth. Simmer another 20 minutes with the lid on. Ladle the stew into bowls and sprinkle with freshly chopped parsley.


Roasted Carrot & Cilantro Soup
This soup freezes really well in small batches and can last up to three months in a deep freeze.
Ingredients:
2 lbs carrots, peeled and uniformly sliced
2 tsp vegetable oil
salt and pepper to taste
1/2 tsp cumin (I think I used about 1 - 1 1/2 tsp cumin, I might use 2 tsp next time)
1 large onion, roughly chopped
2 tbsp vegetable oil
6 small new or nugget potatoes, about 2/3 lb (I think I used about 2 cups russet potatoes)
8 cups chicken stock
1 cup cilantro (lightly packed, stemps cut off)

Directions:
Preheat oven to 400 degrees. Toss sliced carrots in 2 tsp vegetable oil, salt, pepper and cumin. Roast in centre of oven for 30 minutes, turning once in between. Removed when slightly caramelized or blackened. Set aside.

In a heavy bottomed saucepan, saute onion on medium heat in 2 tbsp oil. Meanwhile, peel potatoes and cut into large chunks. Once onions have turned slightly translucent, add potatoes and saute for about 10 minutes.

Add the stock and turn the heat up to high. Once boiling, lower to a simmer. Keep simmering until the potatoes are almost done, about 10-15 minutes, then add the roasted carrots. Cook just enough to bring the carrots up to temperature, then remove from heat.

Pour soup into blender or food processor in batches (or use an immersion blender). Add in your cilantro at this point. Blend until it becomes as smooth as you like.  Return to saucepan and reheat.

Saturday, May 4, 2013

Mom-To-Be Freezer Meal - Soups and Stews I

The fantastic thing about soups, is that they freeze quite well, with a few exceptions to the rule of course. Another wonderful thing about freezer meal soups? They are SUPER easy to prepare. Usually, I take the soup I want out about 30 minutes to an hour before I want to eat, place it in an appropriate sized pot and let thaw out a little before I turn on the element. If I have the stove on already for something else I'm preparing, it's doubly easy. I put the pot with the frozen soup over the element that vents the heat from the oven (on my stove, it's the top right element that has the oven heat vent) to help the soup to thaw out at a faster rate before I turn on the element to actually reheat the soup. If I'm in a rush, I skip thawing and jump straight to reheating the soup to hot - starting at a low heat and gradually turning up the heat as the soup is thawed and becoming hot.


My freezing method for stocks and soups is the "muffin tin method". I spoon whatever soup/stock into my muffin tins. I know that my muffin tins can hold up to 1/4 cup of whatever I want to freeze, which makes thawing easier than if I freeze in a jar or other larger container. It also allows me to take out single serve portions.

Once whatever I'm freezing is frozen and ready to be packaged, I take out my tins and place them on the counter for a few minutes for things to loosen (If I'm in a rush, I'll put some warm water in the bottom of my kitchen sink to encourage quicker loosening - although, I'd make sure to have the extra few minutes for blended/smooth soups, since they loosen pretty quickly and if you place the tin in warm water, even for a few seconds too long, things can get messy and your soup moulds could end up frozen together once they're packaged and refrozen)

Once things are loose and I can turn the mould around while it's inside the tin, I know it's ready to come out. You can take the moulds out a few ways, I usually opt for grabbing a butter knife and popping each one out - but be careful, if you have really nice tins, you can scratch the sides and/or bottoms and they can rust if you let them air dry. Or, you can flip the whole tin over and let them fall out onto your counter or a big cookie sheet.

Then I toss my prepared frozen moulds into a freezer bag, labelled with the contents, cooking directions, the date it was packaged. If I'm giving packaged freezer meals to a friend, I will include a list of ingredients in case they have an allergy I forgot about and I might include the website or the written out recipe in case they like it and want to make it themselves.


Butternut Beet Soup

I liked the idea of this soup. I really like beets quite a bit and I've wanted to start cooking with squash more often.Once I had all the ingredients though, I started to wonder how well all of the flavours would interact with each other. I have to say, I was not disappointed. I think this might be my all time favourite soup - for now that is.

Ingredients:
3 medium beets
4 medium carrots
1 medium butternut squash
5 cups chicken or vegetable broth
1 14oz can unsweetened coconut milk
2 onions, chopped
10 cloves garlic, peeled
4 oz fresh ginger (I used a little less, about 3 oz maybe)
2 bay leaves

2 limes
2 cups fresh cilantro (loose with stems cut off)
1 tsp sriracha - thai chili vinegar hot sauce (I used Franks Red Hot Sauce as I didn't have this and didn't have the money in our food budget to buy any)
1/2 cup plain Greek yogurt

Directions:Clean and peel carrots, beet and squash. Chop into sections less than 4 inches long. They just need to fit into the pot, don't worry about how big they are, you will puree them once they are cooked.

In a large pot (I ended up having to use two pots, I once everything was pureed, I just mixed all the pureed soup together so there would be no chance of inconsistant taste) over medium heat add the carrots, squash, beets, broth, coconut milk and bay leaves. Cover and allow to come to a boil.

Meanwhile, saute the onion in a tablespoon of olive oil over medium heat. Mince the garlic and ginger. Once onion is translucent add garlic and ginger. Saute for an additional minute then add the onion mixture to the pot of stewing vegetables. When the soup pot starts to boil, reduce heat and simmer. Simmer covered for 30 minutes or until the vegetables are tender, stirring occasionally.

While soup is simmering, make the lime cilantro yogurt sauce. In your food processor add the juice of two limes, yogurt, cilantro and hot sauce. Puree until smooth. Pour into a small serving bowl and refrigerate until you are ready to serve the soup.

When the veggies are soft, you are ready to remove the bay leaves and puree the soup. Then use an immersion blender to puree the mixture. If you don't have an immersion blender, puree the soup  in batches through a blender or food processor.

To serve soup fresh, pour into bowls and top with a dollop of yogurt sauce. You can make a design if you like using simple tools like a spoon and chopsticks. If you are freezing the soup, add all the yogurt sauce and blend.

Do you have a favourite freezer meal soup?

Preggo Lady Survey - 41 weeks

How far along: 41 weeks. On Thursday I had a biophysical ultrasound to see how Victoria is doing. She got 8/8! They checked her muscle tone, movement, weight etc. Annnnnd drum roll... they estimate that she weighs about 10 lbs. I also got a no stress test and she's doing fantastic according to that as well. Today, I had a midwife appointment and I got a membrane sweep. As of this morning, I was 50% effaced and dialated. This girl is on the way soon!

Weight gain: From 175 - 212 - 37 lbs

Innie or outtie: It's more of an outtie now, but it's not super popped out.

Are you buying any "post pregnancy" clothes yet? I've just bought some new tops... pants are definitely going to have to wait until after baby makes her appearance.

Sleep: Still doing pretty well. I still only get up once, maybe twice a night to pee. Some nights I don't even get up to pee at all.

Pregnancy Perks: Being rushed to the front of the public washrooom line, people tend to move out of your way in a crowded area and having doors opened for you.


I can still paint my toe nails! This weeks
accomplishment!
Any downsides? People you know are constantly asking you if the baby is here yet. Yes, it's an easy way to open a conversation, but when so many people are asking, it starts to get irritating. I made a Facebook status that said, 'Thank you everyone for taking an interest how Victoria and I are doing. - Yes, I am overdue. Yes, one of us will get a hold of people once she makes her arrival. If we somehow forget to get a hold of anyone, you can be sure that there will be about a million pictures uploaded - trust me, you wouldn't be able to miss it, even if you wanted to. So... no need to ask every day if we've had the baby yet, okay? Okay! That's all!"

Come on people, it's not like I'm a celebrity or anything - I'm not going to keep it on the down low!

Any random strangers come up out of nowhere and touch your belly? No, thank God. I have people I know (or kind of know) touch my belly, which isn't a big deal to me. It wouldn't be a huge deal to me if another preggo came up and touched my belly. But if anyone else came up and touched my belly, I'm not sure how I would handle it.

Embarrassing Pregnant Moment: Still don't have one. I'm sure if my water broke in public, that would totally be on the list.

Lastest Baby Purchases: Hmm, it's been a while since I bought anything.

Latest Baby Gift: We received a package in the mail from a family friend! Shoes, the best softest blanket EVER, toys, clothes and more :) Love it! <3

Movement: She's REALLY changed in this area. She doesn't move as much and she doesn't do her big rolls anymore. She's just getting big and running out of room in there.

Anything going on 'down there'? Yup! My cervix is thinning out and I've started to dialate. I can also feel Victoria pressing down on my cervix A LOT more. Hoping for this weekend! I'm ready to meet my little girl! (And I know for sure it's a girl, I had them double check when I got my ultrasound done. *update on date of publishing* I woke up and found my mucous plug in my underwear... and I've started having contractions since I woke up, but I haven't bothered timing them to determine if I'm actually in labour or not since just a little earlier... so we'll see! I might have a 'May the 4th baby' and then she can have at least one Star Wars themed birthday party. :)

Food Cravings: Hmmm. Nope.

Food Aversions: Not really.

How's Mama? Still super comfortable. A little tired, but I'm still doing fantastic.

What I'm Looking Forward To: Meeting my little girl, being able to sleep/lay down on my tummy again, be able to see if I have anything anywhere on my shirt. I am hoping that labour and delivery will be easy for me.

My Baby in Veg/Fruit Terms: A watermelon!

What Do I Think My Baby Will Look Like? Blonde/light brown hair, greenish-blue eyes, chubby little cheeks but a long/lean little body.

Natural/C-Section/Drugs? Natural with a midwife, baby. (Although if I have to, I will do whatever it takes to get Victoria out safely. And if I have a LONG and hard delivery and I need relief, I am open to taking drugs... I've made it very clear that I'd rather be encouraged to do without rather than have my support group just agree with me that I need the drugs)

Signed up for any classes? I've done quite a few classes - now the ladies from my prenatal nutrition class are starting to joke that there needs to be a book (or a class) entitled, "what the eff do I do now that I've had my baby"!!!???"


Stretch Marks? I have some on my bum, some on the very tops of my thighs where my legs meet my torso, and on the bottom of my belly. And they are getting bigger and spreading to surrounding areas. Am I ashamed or will I cover them up at the beach this year? No way. My body is doing something awesome.

Are you ready for it to be over? I'm ready to meet her, time is ticking little girl.

Wednesday, May 1, 2013

Mom-To-Be Freezer Meal - Banana Nut Bread Muffins (Nuts Optional)

Is it a surprise that I'm going to be talking about a recipe from one of my favourite recipes books? The Williams-Sonoma Essentials of Baking has a great banana bread recipe, and it's quickly become a Go-To for me. It doesn't give instructions or timing adjustments in the book if you want to make muffins instead of a full loaf, so I took the liberty of testing it out. If you choose to make muffins with this recipe, it takes 25-30 minutes until they are done, depending on the climate and region you live in, of course.

 
Now, the reason I have the '(Nuts Optional)' in the posts title, is because I don't often care for nuts in my banana bread - I usually replace the nuts with chocolate chips.
 
Delving a little deeper into why I absolutely <3 LOVE <3 this recipe, is because it's SO versatile! I've subsituted the nuts with so many different ingredients it's ridiculous - and I've loved all of the variations I've tried to date. Below, is a list of substitutions that I've tried and loved.
  • Fresh peaches (I've also tried this with fresh that I've flash frozen myself)
  • Fresh Nectarines (I've also tried this with fresh that I've flash frozen myself)
  • Chocolate chips, obviously
  • Fresh cranberries (I've also tried this with fresh that I've flash frozen myself)
  • Apple
In the future, I would love to try blueberries (thankfully, we have a blueberry farm in the local area, which I plan to visit in the summer) dried cherries and I think it would be interesting to try this recipe with pumpkin. I'm not usually a fan of pumpkin, but I'd like to start experimenting.

To freeze these muffins, I wait until they are completely cooled and then simply toss them into a freezer bag.

So, without further ado, here's the recipe for the:
Williams-Sonoma Banana Nut Bread
Ingredients:
2 large bananas
1 1/2 cups all purpose flour
1/2 cup whole wheat flour (I don't often have whole wheat flour, so I just add more all purpose flour)
2 tsp baking powder
1/2 tsp baking soda
1/4 tsp salt (For those of you who know me, know that I skip adding salt to most recipes)
1/4 tsp grated nutmeg (I add more but I don't measure it out, I also add cinnamon and ground ginger. For these spices, I go by the fragrance they make together rather than measuring)
1 tbsp grated orange zest
1/2 cup chopped walnuts (or whatever you'd like to substitute)
2 large eggs
3/4 cup firmly packed brown sugar
6 tbsp unsalted melted butter
1/2 cup whole milk

Directions:
Position a rack in the middle of the oven, and preheat to 350 degrees, butter and flour a 9x5 inch loaf pan - if making muffins, generously butter the muffin tin. I prefer not to flour the muffin tin.

In a small bowl, mash the bananas. You should have 1 1/3 cups. In a seperate bowl, stir together the all purpose flour, whole wheat flour, baking powder, baking soda, salt (if using) nutmeg (cinnamon and ginger if using), orange zest, and nuts - or chocolate chips. If you are going to use a dried fruit, add it now as well. If you are using fresh fruit, either add it in with the mashed banana or after the batter is formed.

In a large bowl, whisk the eggs until blended and stir in the brown sugar, butter and milk. Add the dry ingredients in 3 batches, alternately with the bananas and stir with a rubber spatula unitl just the batter is moistened.

Pour the batter into the prepared tin and smooth the top with the rubber spatula. Bake until a toothpick inserted into the centre comes out clean, 50-60 minutes for a loaf, 25-30 minutes for muffins. If the surface starts to brown too much (I haven't had this problem with the muffins), cover with a sheet of aluminum foil for the last 15 minutes.

Transfer to a wire rack and let cool in the pan for 5 minutes, then turn out onto the rack and cool completely. For the muffins, they should come out rather easily, but if they don't you may want to leave them in the tin for just a little longer, but don't be afraid to sacrifice one muffin to see if they are ready to come out.

Store in an airtight container at room temperature for 2-3 days or freeze up to one month.

Mom-To-Be Freezer Meal - Pancakes

When I was in the early stages of making my Mom-To-Be Freezer Meal Plan, I have to admit, I completely forgot about breakfasts. It was all thanks (again) to Pinterest for reminding me that first thing in the morning with a new baby, the only thing I might actually want to make from scratch - is coffee.
 
As I've noted before, in my family, we never did freezer meals, so like with all the other recipes I chose, I didn't know what would work well for breakfasts. All I knew was that I didn't like the idea of frozen breakfast borritos. Reason one: I've turned off eggs for the most part since being pregnant. Reason two: I'm not a fan of omlettes - and to me, a breakfast borrito is just an omlette that's rolled up.
 
Thankfully! I LOVE pancakes! I wanted to make waffles as well, but unfortunately, I haven't gotten around to buying a waffle maker yet - and for something as awesome as waffles, I want to get a decent model. So, so far, for freezer meal breakfasts, I've just got pancakes. The freezing method I used for these, once they were cooled, was to wrap each individual pancake in aluminum foil and then toss them into a freezer bag. I've noticed that many people like to put their freezer pancakes in an old bread bag, but without thinking, I recycled mine prior to making the pancakes. To prepare, I take as many I want out of the packaging, put them in the microwave on a plate in a single layer, turning occassionally until they are fully thawed, hot and ready for toppings.
 
I have two recipes that I've made so far, one Martha Stewart recipes that I've liked for ages that you can make with an orange maple butter (the orange maple butter is pretty good from what I remember, but it wasn't earth shattering enough that I have to make it everytime I make pancakes).
The second recipe, which I just found recently, is made with ricotta cheese. I actually looked for a recipe that contains ricotta cheese because for my baked penne with sausage and creamy ricotta (entry to be added) - I actually forgot to add the ricotta to a few of the single serve meals, so I had extra. I still haven't tried this recipe fresh or frozen yet, since ricotta isn't a pasturized cheese and I'm restricted from it for now. I'm also not sure how these pancakes will freeze, but, I decided that I was willing to test it out.
 
ALL that being said, here are my pancake recipes for you.
 
 Martha Stewarts Blueberry Cornmeal Pancakes
Ingredients:
1 cup all-purpose flour
1/2 cup cornmeal
1/4 cup sugar
1 1/4 tsp baking powder
1 tsp coarse salt (I usually leave out salt recommended in recipes)
1/2 tsp baking soda
1 1/2 cups low fat buttermilk
1/4 cup whole milk
3 tbsp unsalted butter, melted and cooled, plus more for griddle
1 large egg, lightly beaten
2 cups blueberries
 
*Note: If I don't have buttermilk, I have used just the cream in the amount needed for both the buttermilk as well as the cream (or vise versa if I don't have the cream)

Directions:
Whisk together flour, cornmeal, 2 tablespoons sugar, the baking powder, salt (if using) and baking soda. In another bowl, whisk together buttermilk, milk, butter and egg. Whisk wet ingredients into dry ingredients until just combined (mixture will be lumpy).
 
Heat a griddle or a large nonstick skillet over med heat. Toss blueberries with 2 tbsp sugar. Brush griddle with melted butter and spoon batter into griddle 1/3 cup at a time. Sprinkle with sugared blueberries, about 2 tbsp per pancake. Cook until edges are set, 3-4 minutes. Flip and cook until golden brown, about 2 minutes. Repeat with remaining batter and blueberries, adding more butter to griddle and keeping prepared pancakes warm on a baking shee in the oven. Serve with orange maple butter and maple syrup. http://www.marthastewart.com/350631/orange-maple-butter


Blueberry Lemon Ricotta Pancakes 
 
Ingredients:
15 ounces low fat ricotta cheese
1/3 cup granulated sugar
2 large eggs
zest of 1 lemon
1 teaspoon vanilla extract
2/3 cup whole wheat pastry flour (or all-purpose flour)
1 cup blueberries
cooking spray
confectioners' sugar or maple syrup, for serving (optional)
 
Directions:
In a medium bowl. whisk together ricotta cheese, sugar, eggs, grated lemon zest and vanilla extract. Fold in flour until just combined; add blueberries, gently mixing until combined. Spray large non-stick skillet with cooking spray and heat to medium-low heat. Add batter, using a scant 1/4 cup for each pancake. Cook until browned, 4 to 5 minutes per side. Transfer pancakes to a paper towel-lined plate.

Serve hot, with confectioners' sugar or maple syrup, if desired.